Save
Once you have created a document, you will be interested in saving the document. Saving means that a file is stored permanently on either a floppy disk or the computer so you can open it up again at any time in the future.
To save a document for the first time, choose Save As from the File Menu. A Window will pop up on your screen. Click on the Save In drop down list and choose a drive to save in. Remember, that the A: is the floppy drive and the C: is the hard drive inside the computer. Once you select the drive, all of the folders and files will be listed that are in that drive. If you want to save the file inside of a folder or subfolder, double click that folder until it appears in the Save In box.
Once you have chosen where to save the file, then type a name for the document in the filename box. You can do this by moving your mouse into the filename box and clicking. You should then see a flashing line, called a cursor, indicating that you may start typing. You may have to erase any words that are displayed by pressing the backspace or delete keys on the keyboard. Backspace erases text to the left of the cursor, whereas delete erases text to the right of the cursor. The reason there is already a name in the filename box is because Word is trying to suggest a name for you based on the first few words in your document. Once you have typed a filename click on the Save button. Word will then save your document and close the Save As window and return you to your document.
![]()
Notice in the Save As window you see a toolbar icon to create a new folder. This option allows you to create a folder inside of the folder, subfolder, or drive that is displayed in the Save In box. When you click on this button, another window pops up asking you to give the new folder or subfolder a name. Type in any name that you want then click OK and the folder or subfolder will be listed.
![]() Once you have saved your document
once, you only need to choose Save from the File Menu,
press CTRL + S, or click the Save icon in the toolbar. By choosing
Save
you are telling Word to save your document in exactly the same place as
you last saved it with the same name. In other words, Save, updates
your file, where Save As allows you to change where the file is saved and/or
the file�s name.
Once you have saved your document
once, you only need to choose Save from the File Menu,
press CTRL + S, or click the Save icon in the toolbar. By choosing
Save
you are telling Word to save your document in exactly the same place as
you last saved it with the same name. In other words, Save, updates
your file, where Save As allows you to change where the file is saved and/or
the file�s name.
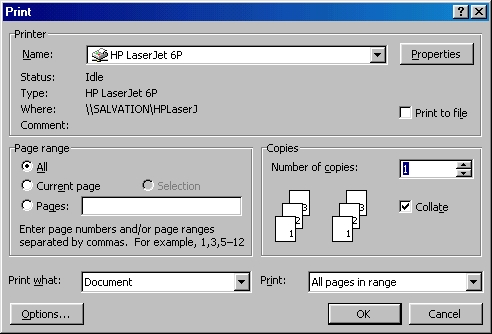
Once you have written a document you may want to print it out. As usual, there are many options for printing. To print, choose print from the File menu. Once you do so, the print window will pop up on your screen. To select which printer you want your document to come from, click on the printer name drop down list and select the desired printer.
You also can choose a print range. A print range is nothing more than telling Word which pages in your document you want to print. You can choose to print your whole document by selecting the ALL radio button (To do that, click your mouse in the white circle next to the word ALL. The white circle is called a radio button. In case you change your mind later on, click in the radio button again and the option is turned off. You know the option is turned off because there is no black dot inside the radio button). Another option is to print just one page by selecting the current page option. Note, the page Word will print when you choose current page is the page your mouse cursor was left in. Another option is print range. For example, I can ask Word to print pages five through seven by typing into the white box next to print range, 5-7. Also, you could chose to print just page five by typing, 5. You could have also told Word to print only pages three, four, and ten by typing 3, 4, 10. A combination of the two is also possible. For instance, you can print pages one through five and pages eight and eleven by typing, 1-5, 8, 11.
On the other side of the print window you can tell Word how many copies you want printed by either typing into the white box next to copies or by clicking on the tiny up and down arrows. There is also an option to collate the printed document. Collating is best defined with an example. If you were printing a three page document and you wanted three copies and if the collated option was chosen, then the printer would print out the pages in the following order: page 1, 2, 3, 1, 2, 3, 1, 2, 3. If the collated option was not selected the pages would have printed in the following order: page 1, 1, 1, 2 , 2, 2, 3, 3, 3. You would then have to manually put the pages in their correct order.
![]() Notice that when the print
window pops up, some options are already selected. Word has pre-selected
options for us. We call these pre-set options the default. When
you print using the printer icon in the toolbar, you will not see a printer
window pop up. Instead, it seems as if nothing has happened until you hear
the printer turn on and see your document being printed out. What has happened
is that the printer icon is a shortcut. When you print using the toolbar
printer icon you are not able to change any of the default options.
The document is then sent directly to the printer using the default options.
Notice that when the print
window pops up, some options are already selected. Word has pre-selected
options for us. We call these pre-set options the default. When
you print using the printer icon in the toolbar, you will not see a printer
window pop up. Instead, it seems as if nothing has happened until you hear
the printer turn on and see your document being printed out. What has happened
is that the printer icon is a shortcut. When you print using the toolbar
printer icon you are not able to change any of the default options.
The document is then sent directly to the printer using the default options.
Tabs and Indents
![]() You should never use the space
bar to indent a paragraph. Instead, place your cursor in front of the words
you want to indent and press the TAB key on your keyboard. Notice
your text becomes pushed to the right by half an inch. If you press the
tab key again your text will continually move to the right in half-inch
increments. You can also press on the Increase Indent toolbar button
to indent your text. If you choose on Decrease Indent your text will be
pushed to the left in half-inch increments. Note: unlike character formatting,
when you format a paragraph you do not have to highlight the whole paragraph.
All you need to do is have your cursor inside the paragraph your interested
in changing.
You should never use the space
bar to indent a paragraph. Instead, place your cursor in front of the words
you want to indent and press the TAB key on your keyboard. Notice
your text becomes pushed to the right by half an inch. If you press the
tab key again your text will continually move to the right in half-inch
increments. You can also press on the Increase Indent toolbar button
to indent your text. If you choose on Decrease Indent your text will be
pushed to the left in half-inch increments. Note: unlike character formatting,
when you format a paragraph you do not have to highlight the whole paragraph.
All you need to do is have your cursor inside the paragraph your interested
in changing.
![]() Paragraphs can be easily
aligned to the left, right, and in between the left and right paragraph
marker. For example, to center text, make sure your cursor is inside the
text. If it is not, then click your mouse on the text and you should then
see the cursor. Next click on the center align toolbar button and the text
will automatically be centered on the page. You can also choose left align
on the toolbar so that the text lines up according to the left paragraph
marker. The right align button, forces the text to line up according to
the right paragraph marker. You will most often use the right align text
when writing letters. The date of a letter is usually pushed to the right,
which can be done by using the right align button. Also, the toolbar has
a button called Justify. Justify aligns text so both the left and right
sides are lined up. Unlike the left align option, justify does not leave
jagged edges on the right side of paragraphs. This document is an example
of paragraphs that are justified.
Paragraphs can be easily
aligned to the left, right, and in between the left and right paragraph
marker. For example, to center text, make sure your cursor is inside the
text. If it is not, then click your mouse on the text and you should then
see the cursor. Next click on the center align toolbar button and the text
will automatically be centered on the page. You can also choose left align
on the toolbar so that the text lines up according to the left paragraph
marker. The right align button, forces the text to line up according to
the right paragraph marker. You will most often use the right align text
when writing letters. The date of a letter is usually pushed to the right,
which can be done by using the right align button. Also, the toolbar has
a button called Justify. Justify aligns text so both the left and right
sides are lined up. Unlike the left align option, justify does not leave
jagged edges on the right side of paragraphs. This document is an example
of paragraphs that are justified.
Return to Word Syllabus