Adding
You can add text in two ways depending on whether you are using a slide layout or not. If you are using a slide layout then you click where the slide says Click to add text. When you do, a cursor appears and you can begin typing. Note with slide layout the text is already formatted for you, however you can always reformat it if you like.
You can also add text by clicking on the
![]() toolbar
button (if you don’t see this button you need to click on the View
Menu, Toolbars, Drawing). You can also go to the
Insert
Menu and choose Text Box. Once you have chosen the
text box you can either click on your slide to get a cursor and start typing
or you can click and drag on your slide to get both a box and cursor and
then start to type. The difference is if you just click and start typing
the text will not wrap. However, if you click and then drag to get a box,
the text will wrap within the box size.
toolbar
button (if you don’t see this button you need to click on the View
Menu, Toolbars, Drawing). You can also go to the
Insert
Menu and choose Text Box. Once you have chosen the
text box you can either click on your slide to get a cursor and start typing
or you can click and drag on your slide to get both a box and cursor and
then start to type. The difference is if you just click and start typing
the text will not wrap. However, if you click and then drag to get a box,
the text will wrap within the box size.
Note even if you are using a slide layout, you can always add your own text or clip art etc. Slide layouts are flexible.
Highlighting
Below is a chart taken from the PP Help File that summarizes how to
select.
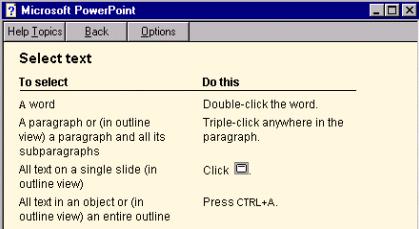
To select text, you can click on the text you are interested in formatting. When you click on the text a cursor appears. You can then click and drag on top of the letters or words you are interested in reformatting so that they are highlighted.
Formatting
Once you have highlighted your text, you can then use the toolbar buttons to change the text. Remember the toolbar buttons below:
Removing
To remove text, highlight the text and hit the DELETE key on the keyboard. Note: to highlight the entire text box click on the border that appears around a selected object. You should not see a cursor.
Moving
To move text from one part of the slide to another you click the text. A box should appear around the text. Move your mouse to one of the four sides of the box, your mouse should turn into a four-sided arrow. Once that has happened you can click and drag to move the text box.
Resizing
To resize text refer to the formatting section. If you want to resize
the text box around your text you first need to click on the text to display
the box. Next move your mouse to any of the eight tiny squares on the box
and your mouse should turn into a double-sided arrow. Once that has happened
you can click and drag to resize the box. The text automatically will wrap
so the text stays within the box.
![]() Word
Art
Word
Art
Word art is really a fun way to type text and is part of each Office ’97 program. Click on the Word art toolbar button. When you do a dialog box appears showing you a variety of different styles of writing. Words are often slanted, bent, or even wavy. The text is already colored and shadowed for you. Click on top of the type of text you are interested in creating and choose OK. Next you will be asked to type your word or message. When you are done, click on OK and Office will create the Word Art for you. You can then move and resize the word art anyway you would like by using the above click and drag skills.
If you want to change the font, font size, bold, or italics features for your word art, then double click it and a window appears where you can make those changes. You can also retype the message. You can change the word art colors, shadows, and more options if you use the toolbar buttons on the Drawing toolbar.
When using a bulleted list in Power Point you can easily change the
size, color, or symbol of the bullet marker. Select the entire bulleted
list and go to the Format Menu and choose Bullet.
A dialog box appears displaying a color drop down list and a size box.
To select a different symbol you can click on the Bullets from
drop down list. As you select different names from this list the symbols
that appear below, change. To select one of the symbols you click on
![]() the symbol (it will appear larger for you) and then choose OK.
the symbol (it will appear larger for you) and then choose OK.
To remove bullets, select the entire bulleted list and click on in the toolbar.
Back to PowerPoint Syllabus