If you would like to copy the contents of a cell to another cell, first select the cell to be copied. Next, choose copy from either the toolbar or from the Edit menu. Once you do, it will appear as if nothing has happened. However, if you select a blank cell and choose paste from either the toolbar or Edit menu, the contents of the cell will be placed into the blank cell.
An easier way to paste information from one cell to another is to select the cell and click and drag on the fill handle. Click and drag means to put your mouse on top of the fill handle and press the mouse button down. Without lifting your finger off the mouse button, move the mouse so you have selected on other blank cells. Once you have dragged the fill handle to blank cells, release your finger off the mouse button. The contents will be copied to the blank cells.
Sometimes you may want to remove the contents of a cell and place that information into another cell. Instead of using the copy command we would choose the cut command. You may be wondering what is the difference between cutting and copying cells. When you choose cut on a selected cell the contents of the cell are deleted. When you choose copy on a selected cell the contents of the cell remains untouched. Both copy and cut then allows you to select blank cells where you can paste the information.
Unlike the copy command, where you have to click and drag on the fill handle, for the cut command you have to click and drag on the thick border that appears when you select a cell. So to cut and paste a cell; select a cell then click and drag on the thick border and once you have dragged to blank cells release the mouse and the contents will be transferred to the blank cells.
You may also right click a cell�s border after it has been selected and drag the border across new cells and release. (You have two buttons on the mouse, one on the left and one on the right. To right click, press the right button on the mouse. To right click and drag, right-click an object and do not lift your finger off the button until you have moved your mouse on top of other cells.) Notice a menu appears when you do so. One of the options is to shift. Shifting allows you to paste the contents of a cell into other cells that are not blank. The information in those cells is then pushed to the right or downwards, automatically creating new blank cells to paste the information into. This is hard to describe. It is best to practice this hands-on to really understand what is happening. You also will see many other advanced options as well in the pop up menu, which will not be covered in the Beginning Course.
Note: any of the above options can also be applied to a cell range, which is a group of selected cells.
Inserting, deleting, and moving
Rows
To delete a row, select the entire row by clicking on the row number and choose Delete from the Edit Menu. You also can delete a column by selecting on the column letter and choosing Delete from the Edit Menu. To delete an entire sheet, make sure you are currently viewing the sheet you want to delete and then choose Delete Sheet from the Edit Menu.
To add a row or column, click on the row number or column letter where you want to add the row or column. Choose Rows or Columns from the Insert Menu. If you want to add more than one column or row at a time, then select more than one column or row and then choose a command from the Insert menu. To add a sheet, choose Worksheet from the Insert Menu.
To reorder the worksheets click on the worksheet name. Notice a tiny triangle and a small white square appear. As you click and drag on the sheet name, the triangle will move, pointing to the place where the sheet will be moved. If you right click on any sheet, a menu will pop up and you will see the delete, insert, move, copy, and many other commands pertaining to sheets. Note: you also have a rename option so you can give a worksheet any name you like.
To Print a document click on the printer icon in the toolbar. To print with more options, choose Print from the File Menu. Once you do so, the Print window will appear on your screen. Here you can choose what printer you want to print to by click on the Name drop down list. Once you do so, a list of all other available printers appears. To select a different printer place your mouse on top of the printer you are interested in and click the mouse button. You should then see that printer�s name appear next to Name.
You can also choose how many copies you would like to print. You can either use the tiny arrow buttons to the right to change the number of copies or you can place your mouse inside the white box where the number is displayed and click the mouse button. You should then see a straight flashing line appear, which is called a cursor. The cursor is useful because it tells you two things. That the computer is ready for you to start typing on the keyboard and the location of the cursor is where you will see your letters or numbers placed once you start typing. To erase what is already inside the white box, use your backspace or delete key to get rid of it. Then you can type a number into the box.
Next, you have the option of printing certain pages of the document. You can do this in the Print Range area. If you click inside the white circle (also called a radio button) next to All, a black dot will appear letting you know that option has been chosen. Choosing All will print the entire document. If you only want to print pages 2 through 5, click on the Page(s) radio button and then put a number 2 in the white box next to From and then place a 5 in the white box next to To. That is how you tell the computer to print certain pages of your document.
Furthermore, you can also print a selected area by first selecting the area that you want to print and then clicking the Selection radio button in the Print What area. Note: you can also print the current sheet by selecting the Active Sheet radio button or print the entire workbook by clicking its radio button.
Print Preview
Before you print you may want to see what the printed document will
look like. You can click on the Preview button in the Print
dialog box or you can choose Print Preview from the File
Menu to do so. After you choose Print Preview, the screen will change to
show you a shrunk down version of your document. It has been shrunk down
so you can see the entire page all at once. To increase the size of the
page click on the Zoom button. To return to the smaller size,
click again on the Zoom button. To see the next page of your document hit
the Next button. To go back, hit the Previous
button. Note you can hit the Print button to print the document.
Choose Page Setup from the File Menu. The first option in the Page Setup dialog box is the paper orientation. There are two options, Portrait and Landscape. Portrait is the normal way of looking at a paper. Landscape is turning the paper on its side. Click the radio button to choose which orientation you would like.
Next, you have the option of shrinking your document so it can fit on fewer number of pages. You can either shrink by a certain percent or you can choose the Fit radio button and type in the number of pages you would like your document to be printed on. Excel will then automatically shrink or readjust the document so it will fit on a certain number of pages.
You can also choose the paper size that you are going to be printing on. Click on the Paper Size drop down list to select the paper size of your choice.
To change the margins of the page, click on the Margins Tab. (You should see the word Margins right next to the word Page at the top). Here you can change all four margins by clicking inside the white box, erasing the number that is there, and typing a new number or clicking on the triangles next to the box to increase or decrease the number. You can also center the document by clicking in the check boxes next to the Horizontal or Vertical options.
Print Titles
Sometimes when you are printing a table with many rows or columns, not
all of the rows or columns fit on one page. You may want Excel to repeat
the names of the row or column headings on the other pages. You can do
this in the Sheet tab of the Page Setup dialog
box. Look where it says Print Titles. To have the row headings
repeated at the top of each page, click on the icon to the right of the
white box. By doing this, the Page Setup window shrinks and you can then
click on the row that you want repeated at the top of every page. Excel
then puts a flashing border around that row (sometimes referred to as the
dancing ants). Excel types in the cell range for you. Columns work exactly
the same way.
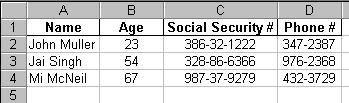
For Example:
This diagram has all column headings showing
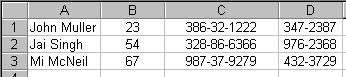
This diagram shows how it can be confusing when you do
not have column headings. In this case you would need to create print
titles.
Back to Excel Syllabus