Opening Microsoft Excel
One way to open Microsoft Excel in Windows ’98 is to click on the Start button, which is located in the bottom left hand corner of your screen on the task bar. Once you click on the Start button a menu pops up. Move your mouse to Programs, which opens a submenu. Move your mouse to the right (keeping your mouse pointer inside the blue box which surrounds the word Programs) until your pointer is inside the submenu. Next, place your mouse on top of Microsoft Excel and then click. MS Excel will launch automatically once you click your mouse.
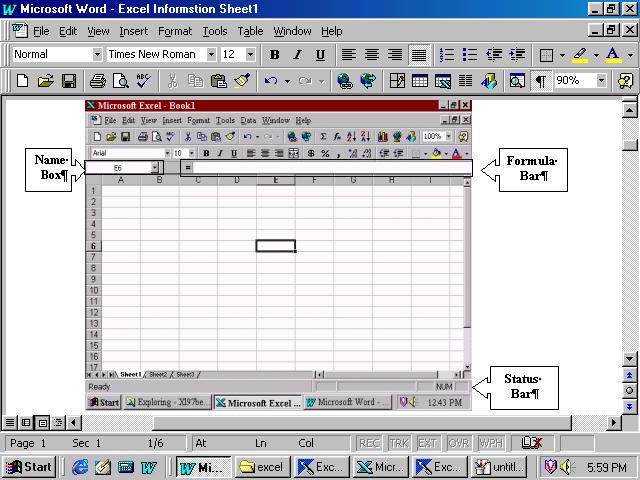
The picture below shows what Excel looks like.
In Excel, rows go across to the left and right and columns go up and down a datasheet. For example, in the above picture, the rows are named with numbers and the columns are named with letters. You also see many boxes on the screen. These boxes are called cells. They are named by the column and row it is located in. For instance, the cell selected in the picture above is named E6. Notice in the picture that column E and row 6 are slightly darker than the others are, letting you know which column and row you are working in. Also, the cell name is listed in the Name Box.
Each file in Excel is called a Workbook or Book for short. Each Book contains many worksheets. A worksheet, or sheet for short, is where you enter in data.
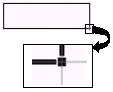 When
you click on a cell you see a black thick line around the cell. Notice
also that there is a tiny black square on the bottom left hand corner of
the cell. The black square is called a fill handle. When
you put your mouse on top of the fill handle your mouse pointer becomes
a plus sign.
When
you click on a cell you see a black thick line around the cell. Notice
also that there is a tiny black square on the bottom left hand corner of
the cell. The black square is called a fill handle. When
you put your mouse on top of the fill handle your mouse pointer becomes
a plus sign.
Opening Files
There are many ways to open files in MS Excel. You can click on File
in your menu bar and choose Open (In other words, place your
mouse on top of the word File in your menu bar and click.
Then move your mouse on top of the word Open and click your
mouse. You should then see a window titled Open come up on your
screen). Click the Look in drop down list to select a drive.
Next double click the folder which contains the file you are interested
in opening. Then double click on the file and it will open in MS Excel.
Notice that next to the Open command in the File menu you see CTRL+O on the right side. This symbol indicates that if you press CTRL and the letter O at the same time on your keyboard the Open Window will pop up on your screen. These functions are called keyboard shortcuts and can be used for other commands as well.
You can also open a file using the recently opened document list, which is located on the bottom of your File menu. MS Excel keeps a list of the last few files that have previously been open. To open a file in this list, click on File in your menu bar and move your mouse on top of the file that you are interested in opening and click.
![]() Also, you can open files by
clicking on the open icon in the toolbar. Placing your mouse on top of
any icon (don’t click, just rest your mouse on top of any icon and wait)
in the toolbar displays a tag that shows the name of each toolbar icon.
Also, you can open files by
clicking on the open icon in the toolbar. Placing your mouse on top of
any icon (don’t click, just rest your mouse on top of any icon and wait)
in the toolbar displays a tag that shows the name of each toolbar icon.
Another way to open files is through My Computer or Windows Explorer. Once inside either of these two windows, choose a drive and then double click on folders or subfolders until you see the file you are interested in opening. Double click on the file and it will automatically open up the file and MS Excel.
Moving Back and Forth From Files
Excel allows you to have more than one file open at the same time. To view other files that are open, click on the Window menu bar. At the bottom, you will see a list of files that are currently open. To view another opened book, click on the book in the list. Excel will switch you to that file. Note that the title bar in Excel changes to display the name of the document.
Closing Files
You can close files by choosing Close from the File Menu, pressing CTRL+C on the keyboard, or clicking on the X in the title bar. Note, the top row of buttons applies to the application, whereas the second row applies to just the file which you are currently viewing.
Saving your work
Saving
Once you have created a document, you will be interested in saving the document. Saving means that a file is stored permanently on either a disk or computer so that you can open it up again and have it exactly the way you left it at any time in the future.
To save a document for the first time, choose Save As from the File Menu. A Window will pop up on your screen. Click on the Save In drop down list and choose a drive to save in. Remember, that the A: is the floppy drive and the C: is the hard drive, which is inside the computer. Once you select the drive, all of the folders and files that are on that drive will be listed. If you want to save the file inside of a folder or subfolder, double click on those folders and sub folders until you see the folder or subfolder which you are interested in displayed in the Save In box.
Once you have chosen where to save the file, then type a name for the document in the filename box. You can do this by moving your mouse into the filename box and click. You should then see a cursor, indicating that you may start typing. You may have to erase any words that are displayed by pressing the Backspace or Delete keys on the keyboard. Backspace erases text to the left of the cursor, where delete erases text to the right of the cursor. Once you have typed a name, click on the Save button. MS Excel will then save your document and close the Save As window and returns you to your document.
![]() Notice in the Save As
window you see a toolbar icon to create a new folder. This option allows
you to create a folder inside the folder, subfolder, or drive that is displayed
in the save in box. When you click on this button, another window
pops up asking you to give the folder or subfolder a name. Type in any
name that you want and click OK and the folder or subfolder will
then be listed.
Notice in the Save As
window you see a toolbar icon to create a new folder. This option allows
you to create a folder inside the folder, subfolder, or drive that is displayed
in the save in box. When you click on this button, another window
pops up asking you to give the folder or subfolder a name. Type in any
name that you want and click OK and the folder or subfolder will
then be listed.
When you have saved your document once, you only need to choose Save
from the File Menu or press CTRL + S or choose the
Save
icon in the toolbar. By choosing Save you are telling Excel
to save your document in exactly the same place as you last saved it using
the same name. If you are interested in changing where the document is
saved or changing the filename you have to choose
Save As
and choose another file path and or change the filename.
There are many ways to move around in Excel. One way is to use your mouse by using the scroll bars. Scroll bars are necessary because you can not see the whole page on your screen at once. Scroll bars allow you to view other parts of a page that are hidden.
You can also use GoTo in the Edit menu to move to any cell (or press CTRL+G or F5). When you do so the GoTo window pops up on your screen. Write the name of the cell in the box where it says reference and hit the OK button with your mouse. To be able to write inside the text box next to reference, place your mouse inside the box and click. Once you see a cursor, which looks like a straight black line flashing, the computer is letting you know it is ready for you to start typing.
Below is a table listing the keyboard commands that allow you to move
from one area to another.
|
|
|
| Key | Cell Pointer Moves To |
| à or Tab | Cell to the immediate right |
| ß or Tab | Cell to the immediate left |
| | Cell up one row |
| ¯ | Cell down one row |
| Home | Cell in column A of the current row |
| Ctrl + Home | First Cell (A1) of the worksheet |
| Ctrl + End or End, Home | Cell at the intersection of last column that has any data in it and last row that has any data in it |
| PgUp | Cell one screenful up in the same column |
| PgDn | Cell one screenful down in the same column |
| Ctrl + à or End, à | First occupied cell to the right in the same row that is either preceded or followed by a blank cell |
| Ctrl + ß or End, ß | First occupied cell to the left in the same row that is either preceded or followed by a blank cell |
| Ctrl + or End, | First occupied cell below in the same row that is either preceded or followed by a blank cell |
| Ctrl + ¯ or End, ¯ | First occupied cell above in the same row that is either preceded or followed by a blank cell |
| Ctrl + PgUp | Last occupied cell in the next worksheet of the workbook |
| Ctrl + PgDn | Last occupied cell in the previous worksheet of the workbook |
Source: Dummies 101: Excel ’97, IDG Books Worldwide Inc.
![]() Another important feature
in Excel is the Zoom. Zoom allows you to enlarge
or shrink your page. There is a Zoom toolbar button and when clicked
you can select any percentage size.
Another important feature
in Excel is the Zoom. Zoom allows you to enlarge
or shrink your page. There is a Zoom toolbar button and when clicked
you can select any percentage size.
Entering data and selecting cells
 You
can enter data by clicking your mouse into a cell and typing. You should
see a black box around the cell before you start typing. You can also enter
text by clicking on a cell and typing information into the Formula
bar. You can type into the formula bar by clicking
inside of it, wait till you see a cursor, and then start typing.
You
can enter data by clicking your mouse into a cell and typing. You should
see a black box around the cell before you start typing. You can also enter
text by clicking on a cell and typing information into the Formula
bar. You can type into the formula bar by clicking
inside of it, wait till you see a cursor, and then start typing.
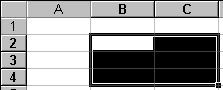
 To
select a cell, place your mouse on top of any cell and click the button.
You should see a black thick line around the cell. When you see this line
it means the cell is selected. If you want to select more than one cell,
click your mouse on a cell and without lifting your finger off the mouse
button, drag your mouse across the other cells you are interested in selecting
and then release your finger off the mouse button. You should then see
a black line around the first cell you clicked in and all the other cells
you selected will be completely black inside.
To
select a cell, place your mouse on top of any cell and click the button.
You should see a black thick line around the cell. When you see this line
it means the cell is selected. If you want to select more than one cell,
click your mouse on a cell and without lifting your finger off the mouse
button, drag your mouse across the other cells you are interested in selecting
and then release your finger off the mouse button. You should then see
a black line around the first cell you clicked in and all the other cells
you selected will be completely black inside.
You can also select cells that are all in the same row or column. Select a column by putting your mouse on top of any column name (that’s the gray boxes where you see A,B,C, etc.) and clicking your mouse. Similarly, you select a row by clicking on the row name (that’s the gray boxes where you see 1, 2, 3, etc.). To select more than one column or row click and drag on any the columns or rows you are interested in.
To select cells, columns, or rows that are not right next to each other, press the CTRL key after you have selected one item and while you are holding the CTRL key select another cell, row, or column.
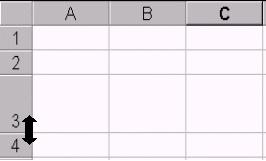
You can resize a column or row to fit the data. To resize a column, move your mouse to the left edge of a column and double click. You can also right click on a column name and choose Column Width. Similarly, you can resize a row by moving your mouse to the top and bottom edges of the cell. When you do so your mouse pointer changes to a double-sided arrow. Once this has happened, click and drag the row height to the appropriate size.
Character Formatting
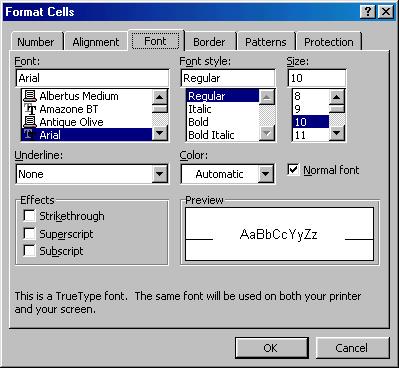 Another name
for text is characters. You can change the size of characters
or font. Font is another name for typeface. The computer
can write in thousands of typeface or fonts. Fonts tend to have weird names
like Bazooka or Times New Roman. To change the size, otherwise called the
font
size, or the font you need to first select the cell you want to
change. Once you select the cell, the contents of the cell are displayed
in the formula bar. You can then click and drag your mouse inside the formula
bar to highlight on specific letters or words. Once the text or cell is
highlighted, you can click on Cell in the Format
menu and click on the Font tab and choose from a variety
of fonts, font sizes, font colors, or effects using drop down menus and
check boxes. Note: font size, font, font color, and font styles are also
in the toolbar.
Another name
for text is characters. You can change the size of characters
or font. Font is another name for typeface. The computer
can write in thousands of typeface or fonts. Fonts tend to have weird names
like Bazooka or Times New Roman. To change the size, otherwise called the
font
size, or the font you need to first select the cell you want to
change. Once you select the cell, the contents of the cell are displayed
in the formula bar. You can then click and drag your mouse inside the formula
bar to highlight on specific letters or words. Once the text or cell is
highlighted, you can click on Cell in the Format
menu and click on the Font tab and choose from a variety
of fonts, font sizes, font colors, or effects using drop down menus and
check boxes. Note: font size, font, font color, and font styles are also
in the toolbar.
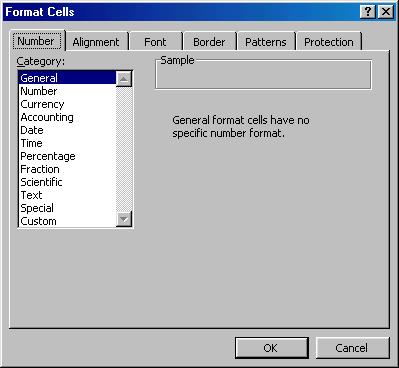 Also in the
Cell
window, using the Number tab, you can tell the computer how
to format numbers, dates, percentages, fractions, and more. Click on the
category
item and the type you are interested in and then choose OK.
Likewise, you can format using the alignment, boarder, and pattern tabs.
Note: you can format many columns or rows at once.
Also in the
Cell
window, using the Number tab, you can tell the computer how
to format numbers, dates, percentages, fractions, and more. Click on the
category
item and the type you are interested in and then choose OK.
Likewise, you can format using the alignment, boarder, and pattern tabs.
Note: you can format many columns or rows at once.
Excel will also continue a number or text pattern for you. For example, if you typed in Jan in one cell then click and drag the fill handle to the right you would see the word Feb automatically appear. Excel tries to predict what you are trying to type in. Also with numbers, if you typed in 5, 10, and 15 in three cells, selected all three cells, and dragged the fill handle to the right you would see the numbers 20 and 25 in those cells. These are examples of data series. Excel can recognize many data series.
Back to Excel Syllabus